
Switching from bash to zsh
Starting with macOS 15 Catalina, Apple is switching to zsh for the default macOS shell. Zsh is utterly configurable with essential options and plugins, and an informative prompt theme. This article will explain how to optimally set things up to achieve just that.
It all started like this: I upgraded macOS Mojave to Catalina and immediately after opening a terminal window, a message got my attention:
The default interactive shell is now zsh.
To update your account to use zsh, please run `chsh -s /bin/zsh`.
For more details, please visit https://support.apple.com/kb/HT208050.
Inarguably, this was annouced at WWDC 2019 (Worldwide Developers Conference), Apple replaced Bourne Again SHell starting with macOS Catalina with Z shell for licensing reasons.
However, Zsh is only the default shell on newly created user accounts, so when you perform an upgrade to Apple macOS Catalina you remain on Bash and keep being advised to update your account to use Zsh.
As a web developer, using the terminal is part and parcel of my day. I spend most of my time using a browser, a code editor and a terminal emulator, and I want things to look pretty and useful in my terminal.
Apple changed its default shell to zsh (Z shell)and so I did. I wanted the "naging" message described further up to disappear and I was curious about what szh is like.
Let me share with you how to install, configure and enhance this new default shell language.
What is shell?
Shell is simply a command line interface (CLI) that allows users to interact with the computer’s operating system. A shell is just an interface to your operating system. An interactive shell allows you to type in commands through what is called standard input, or stdin, and get output through standard output and standard error, or stdout and stderr.) For a long time, the bash was a default shell in macOS.
Bash vs Zsh
Bash (Bourne-again shell) has been the primary macOS shell since OS X 10.2 Jaguar. Zsh also called the Z shell, is an interactive shell which incorporates a lot of useful features from other shells.Since it’s based on the same shell as Bash, ZSH has many of the same features. The key changes are:
Automatic cd (change directory): Simply type the name of the directory.
Spelling correction and completion: Minor spelling mistakes are fixed. Much easier to navigate directories, especially in combination with automatic change directory.
Plugin and theme support: There are many plugin frameworks, the standard shell is ok, but you can make it look awesome. Great utility as well for developers with Git integration.
So let us switching to zsh
To change a user account’s default shell on macOS, simply run the chsh -s (change shell) command in a Terminal window.
As i was being advised in the Bash terminal window; in order to update my account to use Zsh, i ran:
chsh -s /bin/zshand don’t worry you can always change the default shell to Bash by running the following command:
chsh -s /bin/bashIf you are not on Catalina or higher, zsh is not already your default shell. Either way, the copy of zsh available on macOS by default is that one that shipped with the system, which will get out of date. So the first thing to do is to install the latest version, with Homebrew.
brew install zshFixing some paths
I thought I was done with configuring the Zsh shell until i realised that previously installed nvm, node and npm were not found.
But no worries, here comes the fix:
You should have a .bashrc and a .zshrc file in your home directory. As you now changed to zsh, it will use ~/.zshrc instead of ~/.bashrc. And your .bashrc file probably contains lines like export PATH=... just copy those to .zshrc and reopen the terminal it should work flawlessly 😉
Using zsh frameworks
Now it is time for some configuration!
As you get into zsh management, you’ll also see Oh My Zsh and Prezto. Both are “zsh frameworks”, huge collections of settings, customizations, aliases, and scripts, with support for managing themes. Installing either will significantly increase the time it takes to load a new terminal ☹️, and will provide much more there than most users need.
Advanced users will enjoy digging through the source looking for useful bits.
Setting up our zsh options
Now that you have a cool new shell, it is time to use its full potential and get the full benefits of the Zsh shell. Zsh has a huge number of options. See them all at zsh.sourceforge.net.
Configuration for zsh is done in a .zshrc file found in your home directory (i.e. ~).
Add this lines in your .zshrc file in order to auto change directories:
# Changing directories
setopt auto_cd
Now you can use the shorthand ~/Sites for cd ~/Sites .
Please refer to the Zsh documentation on Changing directories.
Time to add a theme
Themes can be cool or can be sexy but they undeniably can help you visualise the information you need.
There is a fair amount of custom themes —aka "prompts" for zsh interactive shells. Two favoured prompts are Powerlevel9k and Spaceship.
Let's see how to give our terminal a highly functional prompt:
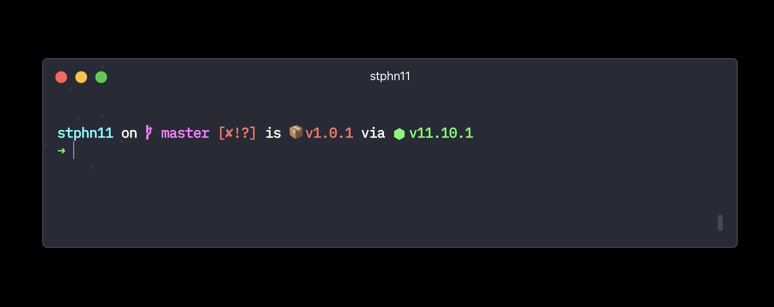
Spaceship is a minimalistic, powerful and extremely customizable Zsh prompt. Spaceship can display the following information:
- Directory name
- git repository information
- Current Node version
- Package version (the one found in a package.json file)
- and much more
You can install spaceship prompt with npm or yarn; simply run yarn install -g spaceship-prompt.
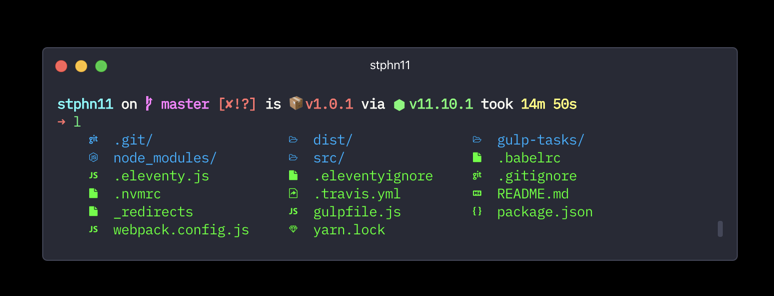
Folder and File Icons
Using Color LS, you’re able to list the contents of a directory and display icons next to folder and file names. To install Color LS; follow these instructions.
Now it's time to add aliases
those are some excerpt of my aliases
alias y="yarn"
alias ya="yarn add"
alias yst="yarn start"
Going further
Since you changed your shell why not pushing a bit further. I am a designer and I fancy neat and clean interfaces. I came accross Hyper and i decided to give it a go. Hyper is a terminal built on web technologies, based on JavaScript, HTML and CSS providing a beautiful and extensible experience for command-line interface users.
Conclusion
ZSH provides a huge number of improvements to make your terminal experience better and I kind of regret this late discovery. Switching from Bash to Zsh was effortless and made my Terminal look great again.
Hopefully this article has given you ideas on how to improve your terminal setup. If you know about other means of improving productivity using ZSH, you can drop them on the comment section, I will be glad to hear from you.
Always remember: No console, no developers 😜